How To Insert Checkbox in Google Docs with or without Strikethrough
Google Docs isn’t just for writing essays or business reports—it’s also a surprisingly handy tool for creating interactive checklists, task trackers, and forms. One of the most requested features? The ability to insert checkbox in Google Docs.
Whether you’re a student tracking assignments, a project manager organizing tasks, or simply making a shopping list, checkboxes make it easy to visually track progress. The good news is that Google Docs has built-in checklist features, and they’re incredibly easy to use once you know where to look.
Why Use Checkboxes in Google Docs?
Before we get into the “how,” let’s talk about the why. Here’s why inserting checkboxes can be a game-changer:
- Task Tracking – Quickly mark tasks as done.
- Team Collaboration – Share checklists in real-time with teammates.
- Organized Notes – Perfect for meeting notes, agendas, and study guides.
- Improved Visuals – Checkboxes break up text and make content easier to scan.
Unlike bullet points, clickable checkboxes in Google Docs let you check and uncheck items without cluttering your document.
Insert Checkbox in Google Docs Using the Checklist Feature
The easiest way to insert a checkbox in Google Docs is by using the built-in checklist tool.

- Open Google Docs
- Open your document or create a new one.
- Select Where to Add the Checkbox
- Click where you want your checklist to begin.
- Click the Checklist Icon
- In the toolbar at the top, find the Checklist button (it looks like a small square with a checkmark).
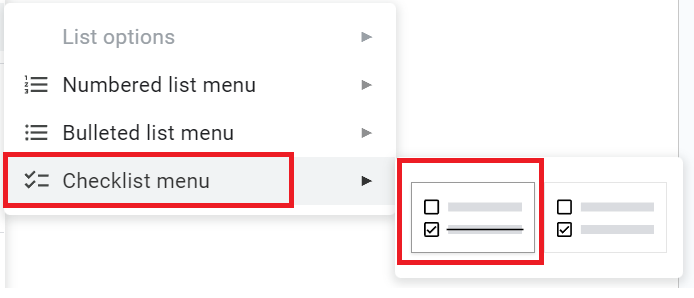
- If you can’t see it, click on Format → Bullets & numbering → Checklist menu.
- Type Your First Task
- After adding the checkbox, just start typing your list item.
- Press Enter for the Next Checkbox
- Every time you hit Enter, a new checkbox will automatically appear.

The selected text will now be preceded by a clickable checkbox. You can click on the checkboxes to add a checkmark and strike-through the accompanying text.

Google Docs Checkbox Without Strikethrough
By default, when you click a checkbox in Google Docs, it adds a checkmark and strikes through the accompanying text. However, you can customize the checkbox if you want to remove the strikethrough effect.
Here’s how to insert checkbox in Google Docs without strikethrough:
- Open a new or existing Google Docs document in your web browser.
- Type the text that you want to add a checkbox to.
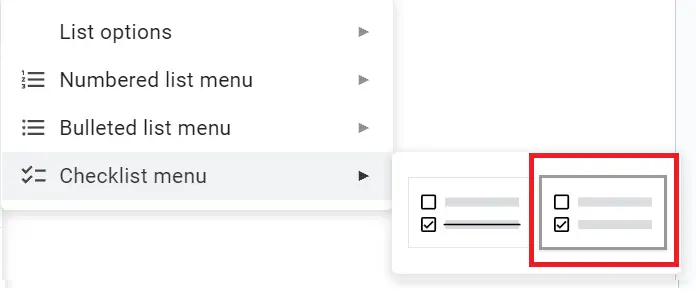
- In the “Menu bar” click on “Format” navigate to “Bullets & numbering” and choose “Checklist menu”.
- Select the hollow square option from the bulleted list options without a line.

This will add a Google Docs checkbox without strikethrough.

Shortcut to add checkbox in Google Docs
- Open “Google Docs” on your web browser and create a new document or open an existing one.
- Type the text to which you want to add checkboxes to. For example, to make a checklist, create a list of items on the docs and then select and highlight them.
- Now press the shortcut keys “Ctrl+Shift+9” on a PC or “Cmd+Shift+9” on a Mac.
- The checkboxes will be preceded by the selected items.
Insert Checkbox in Google Docs Manually with Special Characters
With these easy steps, you can quickly insert the Google Docs checkbox symbol in a document using special characters.
- Open a Google Docs document.
- Click on the place where you want to insert a checkbox.
- Click on the “Insert” option from the menu and select “Special characters”.
- In the “Search” box, type “checkbox”. This will show a list of check box and check mark characters you can use.
- Click on the desired checkbox symbol to add it to the docs.

Draw Checkbox
How your checkbox looks like

How to Insert Checkboxes in Google Docs Mobile App
The process is slightly different on mobile (Android or iOS).
- Open the Google Docs app.
- Tap the + icon to create a new document or open an existing one.
- Tap the bulleted list icon in the toolbar.
- From the list styles, select the checklist option.
- Type your first task, then hit Return for the next checkbox.
Can I make checkboxes clickable in Google Docs?
Yes, but they only work for marking off items visually. For actual form submissions, use Google Forms.
Can I add checkboxes in Google Sheets instead?
Yes, in Sheets you can insert fully interactive checkboxes via Insert → Checkbox.
Why is my Google Docs checkbox not printing?
Make sure you are using the built-in checklist feature, not special character symbols. Before printing, go to File → Print preview and confirm the checkboxes are visible. If printing from Chrome, enable “Background graphics” in print settings.
Can I assign a Google Docs checklist item to someone?
Yes. In Google Workspace, right-click the checklist item and select Assign → [Person’s Name]. The task will appear in their Google Tasks or email for tracking.
How do I make Google Docs checkboxes bigger?
Highlight the checklist text and increase the font size. The checkbox size changes along with the text size.
Why isn’t the Google Docs checkbox shortcut working?
On Windows, the shortcut is Ctrl + Shift + 9; on Mac, it’s Cmd + Shift + 9. If it doesn’t work, check your Google Docs keyboard shortcuts or disable any browser extensions that might override it.
Learning how to insert a checkbox in Google Docs is simple but powerful. Whether you’re creating a personal to-do list, planning a project, or sharing a checklist with your team, this feature can help keep you organized and productive.
- Related Article –
- How To Insert Special Characters in Google Docs
- How To Strikethrough in Google Docs
- How To Strikethrough in Google Slides
- Check word count in Google Docs
- Insert a text box in Google Docs
- Put an image behind text in Google Docs
- Add a watermark in Google Docs
- Change page to landscape in Google Docs
- Use document outline in Google Docs
- Delete a page in Google Docs
- Create an application form in Google Docs