How to Put Text Over an Image in Google Slides (Step by Step)
Wondering how to put text over an image in Google Slides? If you’ve ever dropped a photo onto a slide and then couldn’t figure out how to get your text to sit on top of it, you’re not alone. By default, whatever you add last in Google Slides sits on top of everything else, which usually means your image ends up covering your text instead of the other way around.
The good news: learning how to put text over an image in Google Slides (or, said the other way, putting an image behind text) takes less than a minute once you know where to look. This guide walks through the exact steps, plus how to make the text actually readable once it’s overlaid.
The Short Answer
There are two ways to put text over an image in Google Slides, depending on whether you add the image or the text first:
- Adding text after the image is already there? Just insert a text box — it’ll automatically sit on top, no extra steps needed.
- Adding an image after the text already exists? Insert the image, then send it backward so the existing text pops back in front.
Both come down to the same underlying concept: Google Slides stacks objects in the order you add them, and you can reorder that stack (called the “z-order”) anytime. Here’s each method in detail.
Method 1: Put Text Over an Image (Image Already on the Slide)
Step 1: Insert Your Image
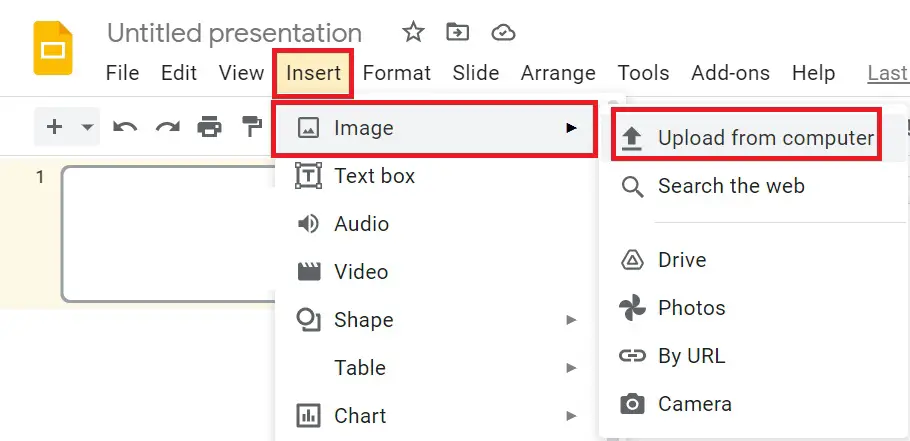
Open your slide and go to Insert > Image, then choose whether to upload from your computer, search the web, or pull from Google Drive/Photos. Resize and position the image so it fills the area of the slide you want.
Step 2: Add a Text Box on Top of the Image
Go to Insert > Text box, draw the box wherever you want it on the slide, and type your text. Because you’re adding the text box after the image, it will automatically land on top — no reordering required.
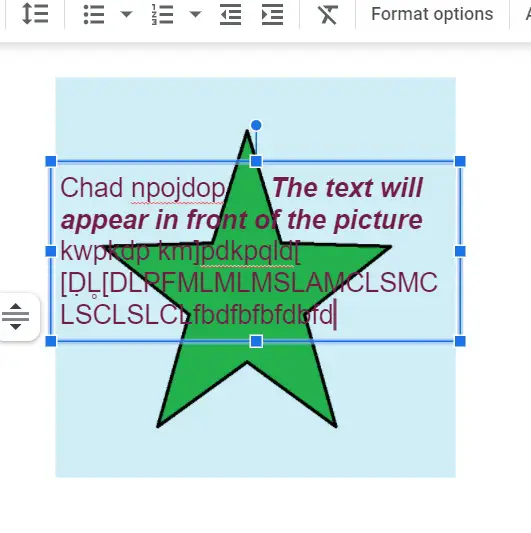
Drag the text box to position it precisely, and use the resize handles to adjust its width so your text wraps the way you want.
Tip: lowering the image’s opacity slightly before adding text can make the overlay much easier to read.
Method 2: Put an Image Behind Text (Text Already on the Slide)
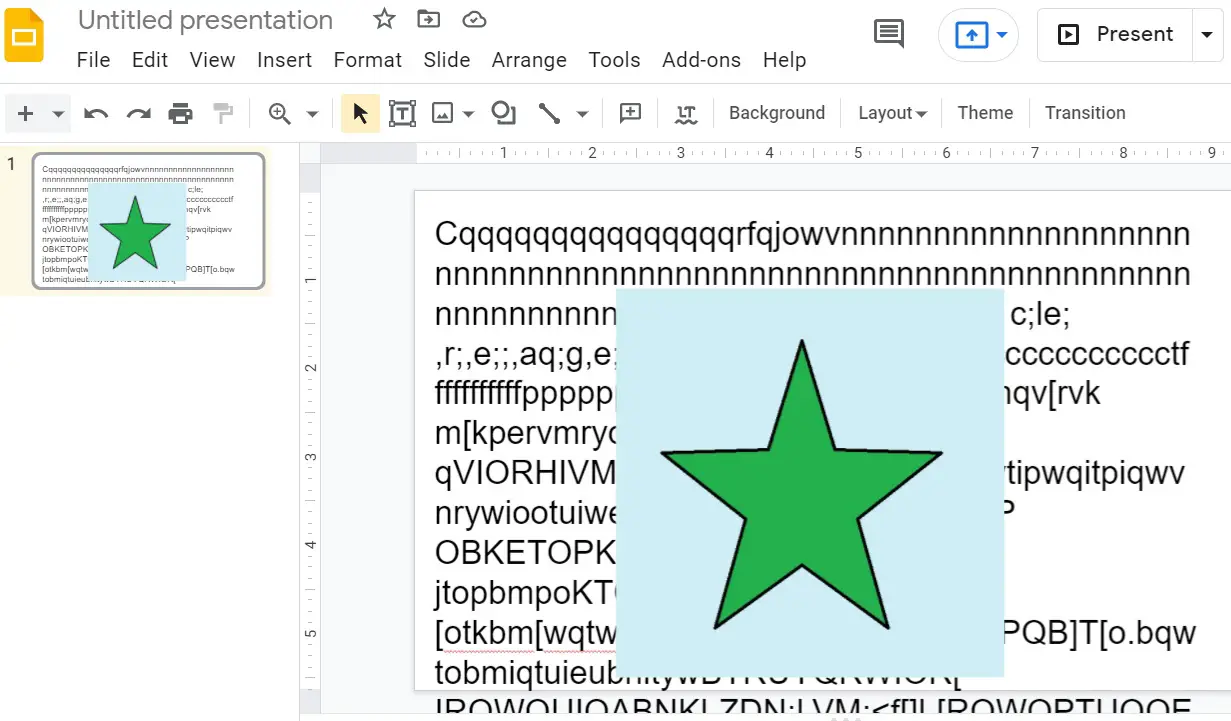
If you’ve already written your text and now want to drop an image in as a background behind it, inserting the image will place it on top of your text by default — you’ll need to send it backward.
Step 1: Insert the Image
With your text already on the slide, go to Insert > Image > Upload from computer (or your preferred source). At this point the image will cover your text.
Step 2: Send the Image Backward
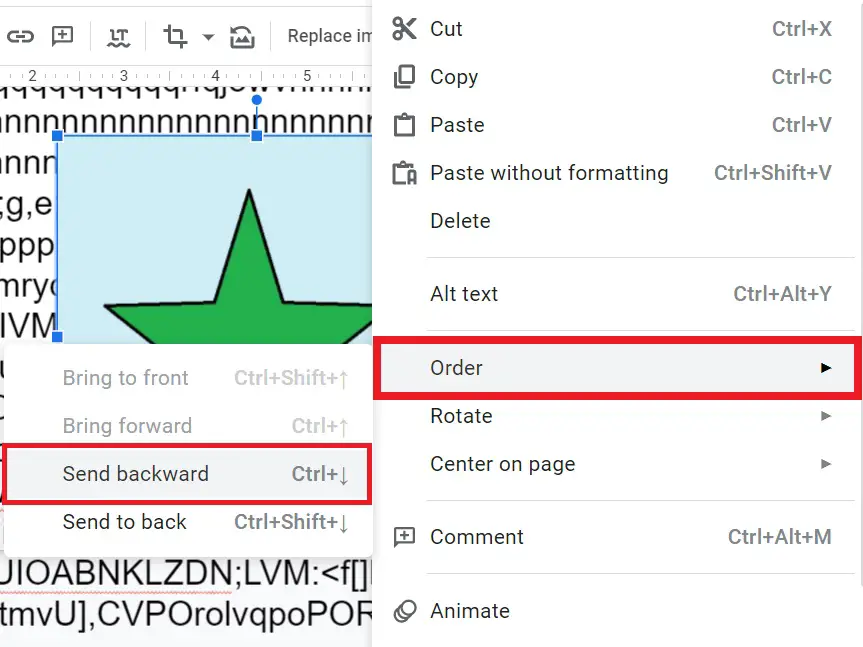
Right-click the image and hover over Order, then choose one of the following:
- Send backward — moves the image back one layer at a time (useful if there are multiple overlapping objects).
- Send to back — moves the image all the way behind every other object on the slide in one go.
You can also reach this from the top menu: Arrange > Order. Keyboard shortcuts (Windows/Chrome OS, with Mac equivalents in parentheses using ⌘):
- Send backward one step: Ctrl + ↓ (⌘ + ↓)
- Send to back completely: Ctrl + Shift + ↓ (⌘ + Shift + ↓)
- Bring forward one step: Ctrl + ↑ (⌘ + ↑)
- Bring to front completely: Ctrl + Shift + ↑ (⌘ + Shift + ↑)
Your text will now appear in front of the image, just like a background photo with a caption on top.
Make the Overlaid Text Actually Readable
Placing text over a busy or bright image often makes it hard to read. A few quick fixes:
- Add a semi-transparent shape behind the text. Insert a rectangle, send it just above the image (but below the text) in the order, fill it with black or white, and lower its opacity to around 40–60% using Format options > Fill color > Custom > adjust transparency.
- Add a text shadow. Select the text box, go to Format options > Text, and turn on Drop shadow to help it separate from the background.
- Change the text color. White text on dark images (or dark text on light images) is usually the safest, highest-contrast choice.
- Darken the image slightly. Select the image, open Format options > Adjustments, and lower the brightness a touch so text pops more without needing extra shapes.
Does Google Slides Support Text Wrapping Around an Image?
It’s worth noting that “putting text over an image” is different from “wrapping text around an image” (like you can in Google Docs or Word). Google Slides doesn’t have a native text-wrap feature — text boxes are independent objects and won’t automatically flow around a picture’s edges. If that’s what you’re trying to do, you’ll need to manually size and position separate text boxes around the image to fake the effect.
Frequently Asked Questions
How do I put an image behind text in Google Slides?
Select the image, right-click, choose Order, then Send to back. Any text boxes on the slide will then appear in front of it.
How do I put text in front of an image?
Add the text box after the image is already on the slide — it will land in front automatically. If the text was added first and got covered, select it and use Arrange > Order > Bring to Front.
Why is my image covering the text?
Whichever object was added most recently sits on top by default. Since the image was likely added last, it’s now covering the text underneath — send it backward to fix it.
How do I overlay text on an image?
Insert the image first, then insert a text box on top of it. For better readability, add a semi-transparent shape or shadow behind the text before finalizing the slide.
Can I wrap text around an image in Google Slides?
No, Google Slides doesn’t support native text wrapping. You can manually recreate the look using separate, precisely-sized text boxes positioned around the image.
How do I put text on top of an image?
Add your text box after inserting the image so it sits on top by default, then reposition and resize it as needed. No extra layering step is required in this order.
Final Thoughts
Once you understand that Google Slides layers objects by order rather than by a dedicated “text over image” setting, learning how to put text over an image in Google Slides becomes a quick, repeatable step: insert the image, send it to back, drop a text box on top, and adjust for contrast. Use this same layering trick anytime you need shapes, icons, or logos to sit behind or in front of one another on a slide.