How to Create a PowerISO Bootable USB (+ USB-HDD Guide)
PowerISO is one of the most popular tools for creating a bootable USB drive from an ISO image. In this guide, we’ll walk through exactly how to make a PowerISO bootable USB step by step, explain what the “USB-HDD” write method actually does, and cover common issues people run into along the way.
There’s plenty of software available that can create a bootable USB from an ISO image. Here we’ll cover two options:
- PowerISO
- Rufus
PowerISO is a powerful disk image management tool. Beyond creating a PowerISO bootable USB from ISO files for Windows 10 and 11, it can burn CDs/DVDs, append data, create virtual drives, and more. It supports both 32-bit and 64-bit operating systems.
How to Make a PowerISO Bootable USB
Before creating a bootable USB using PowerISO, make sure your USB drive is empty. If it isn’t, format it first using the normal Windows formatting process — if it contains data, PowerISO will either refuse to use it or the data will be lost during the bootable process. You can download PowerISO here.
1. Prepare the USB Drive
Open PowerISO and insert the USB drive you’ll use to create your PowerISO bootable USB.
2. Select “Tools” and “Create Bootable USB Drive”
From the PowerISO menu, click “Tools,” then select “Create Bootable USB Drive” from the drop-down. This opens the Create Bootable USB Drive window.
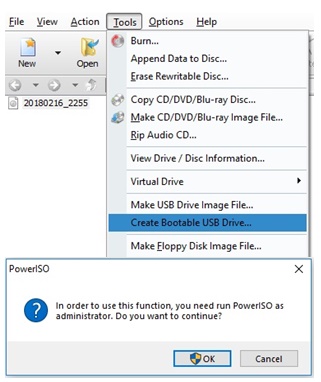
You’ll be prompted for administrative permission — click OK to proceed.
3. Choose the Source Image File
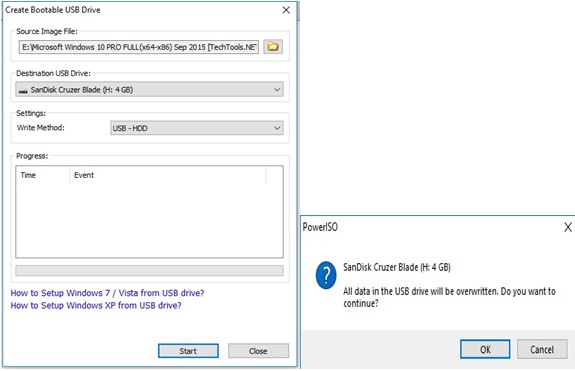
Select the source ISO image you want to use, and make sure your USB drive is connected.
4. Select the USB Drive and Write Method
If you have multiple USB drives connected, select the correct destination drive. Then choose your write method — this is where “USB-HDD” and “USB-ZIP” come in (explained in detail below). For most modern systems, USB-HDD is the recommended write method.
5. Click “Start”
Click Start to begin. PowerISO will show a security warning that existing data on the drive will be overwritten — click OK to proceed. The process takes a few minutes depending on the size of your ISO file and USB speed.
If everything completes without error, your USB is now bootable. If there’s a problem with the drive, PowerISO will show an error message instead.
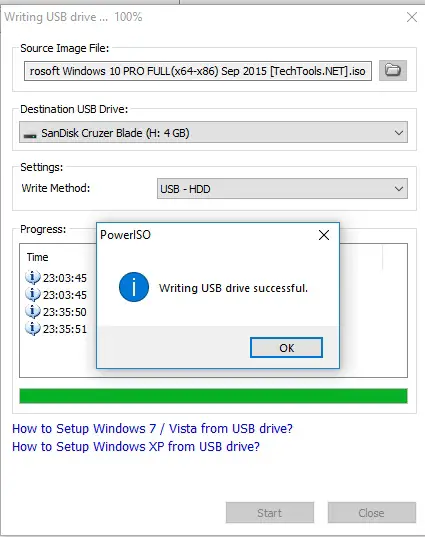
When you see “Writing USB drive successful,” your PowerISO bootable USB is ready to use.
Note: once PowerISO makes your USB bootable, it will no longer function as a normal storage drive. To restore it to a normal state, simply reformat it in Windows.
What Is the USB-HDD Write Method in PowerISO?
When creating a PowerISO bootable USB, you’re asked to choose a write method — usually USB-HDD or USB-ZIP. These determine how the USB drive is formatted and how your computer’s BIOS/UEFI reads it as a boot device.
- USB-HDD treats the USB drive like a hard disk. It’s compatible with most modern motherboards and is the recommended option for Windows 10 and Windows 11 installation media.
- USB-ZIP treats the drive like a removable ZIP disk. It’s an older method mainly needed for legacy BIOS systems that don’t support USB-HDD emulation.
If you’re not sure which to choose, start with USB-HDD — it works on the vast majority of current PCs. Only switch to USB-ZIP if your system fails to boot from the USB-HDD version.
PowerISO vs. Rufus: Which Should You Use?
Both tools can create a bootable USB from an ISO file, but if you’re deciding between a PowerISO bootable USB and a Rufus one, here’s how they suit slightly different needs:
- PowerISO is a full disk image suite — it also creates, edits, and mounts ISO/BIN files, burns discs, and manages virtual drives, but it’s shareware (limited free trial).
- Rufus is a free, lightweight, open-source tool built specifically for creating bootable USB drives — faster to download and simpler if bootable USB creation is all you need.
If you only need to make a bootable USB occasionally and want a smaller, free tool, see our guide on using Rufus to create a bootable USB. If you need broader disk image management features, PowerISO is the better fit.
Troubleshooting PowerISO Bootable USB Issues
PowerISO bootable USB not working / won’t boot
Try recreating the USB using the USB-ZIP write method instead of USB-HDD, or vice versa. Also confirm your BIOS/UEFI boot order has the USB drive set as the first boot device, and that Secure Boot settings match what your ISO requires.
PowerISO write method error
This usually means the USB drive wasn’t fully empty or has a file system PowerISO can’t work with. Reformat the drive to FAT32 or NTFS first, then try again.
How long does PowerISO take to create a bootable USB?
Typically a few minutes, depending on the size of the ISO file and the read/write speed of your USB drive. Larger Windows installation ISOs (5GB+) on slower USB 2.0 drives can take 10–15 minutes.
Does PowerISO work on Windows 11?
Yes, you can create a PowerISO bootable USB on Windows 11 as well as Windows 10, 8, and 7, in both 32-bit and 64-bit versions.