How to Add Underline in Google Docs
Google Docs is a popular cloud-based word processor that lets users create, edit and share documents in real time. Google Docs underline text is one of the most basic formatting options available in Google Doc.
In this article, we will explore How to Underline in Google Docs in different ways using formatting toolbar, shortcuts, etc.
How to underline in Google Docs using Formatting Option
The first way to add underlines in Google Docs is to use the underline formatting option. Here are the step-by-step instructions:
- Open the Google Docs document on your computer.
- Highlight the words that you want to underline.
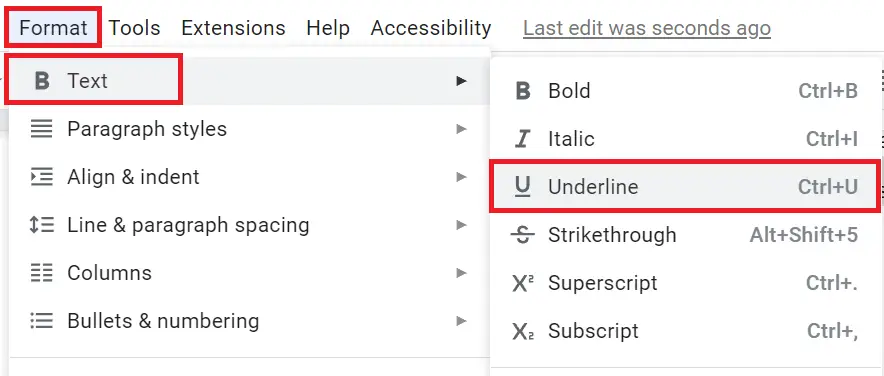
- In the “Menu bar”, click on the “Format” option then click on “Text” option and select “Underline“.
- The text you highlighted will now be underlined.

How to underline text in Google Docs using Toolbar
The second method to put a line under text in Google Docs is by using the formatting toolbar. Below are the step-by-step instructions to do so:
Open the Google Docs document on your computer.
Highlight the text that you want to underline.
From the “formatting toolbar”, click on the “Underline” button. It looks like a U with a line underneath it.

The text you highlighted will now be underlined.
Add underline in Google Docs using shortcut
The third method to underline something in Google Docs is by using keyboard shortcuts. Here are the step-by-step instructions to do so:
- Open your Google Docs document.
Select the text you want to underline. - Press “Ctrl + U” on Windows or “Cmd + U” on Mac to add a single underline.
- Press “Period Key” to add a dotted line. You can check step by step on dotted line.
Google Docs Underline Whole Line
Shortcut keys are a great way to underline whole line in Google Docs just press “Ctrl + U” on Windows or “Cmd + U” on Mac to add a single underline.
Adding underline in Google Docs is a simple process, with multiple options available to suit your needs. Whether you prefer to use the formatting toolbar, keyboard shortcuts, or the “Format” menu.