How to Double Space in Word – 5 Methods (Windows & Mac)
Quick Answer: Select your text, then press Ctrl + 2 (Windows) or Cmd + 2 (Mac) to instantly apply double spacing in Word. To revert to single spacing later, press Ctrl + 1 or Cmd + 1.
If you are wondering how to double space in Word, you have several easy methods at your fingertips. You can use the Home tab, quick keyboard shortcuts, advanced paragraph settings, or even set double spacing as your default layout for future documents.
Double spacing in Word is one of the most common document formatting tasks required for college essays, legal documents, and professional reports. The good news is that it takes less than 10 seconds to apply once you know where to look.
What Is Double Spacing in Word?
n Microsoft Word, double spacing sets the vertical line interval to 2.0, which is exactly twice the height of standard single spacing. This inserts a clean, blank line between every line of text.
Academic formatting styles—such as APA, MLA, and Chicago—strictly require double spacing. It improves general text readability and leaves physical room for teachers, editors, or legal teams to write handwritten notes and corrections.
Method 1: Use the Home Tab (Fastest & Easiest)
This is the most beginner-friendly way to apply double spacing in Word to a specific block of text.
- Open your document in Microsoft Word.
- Highlight the specific section of text you want to alter. (Tip: Press
Ctrl + Aon Windows orCmd + Aon Mac to select the entire document). - Navigate to the Home tab on the top menu ribbon.
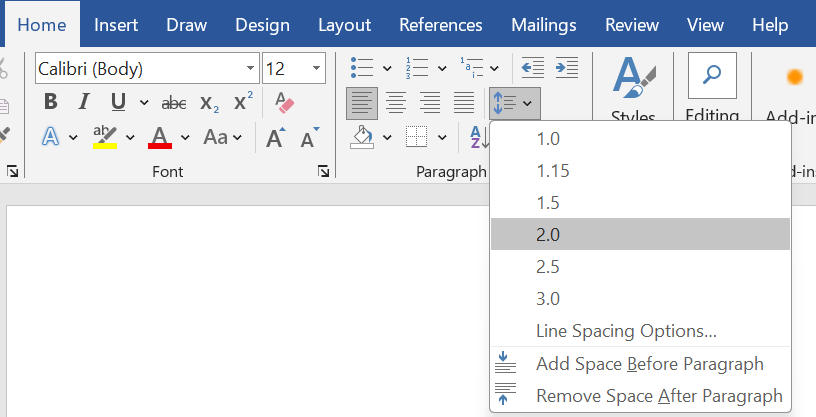
- Locate the Paragraph settings group and click the Line and Paragraph Spacing icon (represented by text lines with blue vertical arrows).
- Select 2.0 from the dropdown menu.
Method 2: Keyboard Shortcut to Double Space in Word
If you want to know how to double space in Word without touching your mouse, use these built-in keyboard shortcuts:
- Windows: Highlight your text and press Ctrl + 2
- Mac: Highlight your text and press Cmd + 2
To go back to single spacing, press Ctrl + 1 (Windows) or Cmd + 1 (Mac).
Method 3: Use the Paragraph Dialog Box (Most Control)
If your text looks uneven even after changing the settings, you can use the Paragraph dialog box to fix hidden formatting issues.
- Select your text.
- Click the Home tab.
- Click the small launcher arrow at the bottom-right corner of the Paragraph group to open the settings box.
- Under the Line Spacing dropdown menu, choose Double.
- Crucial Step: Set both the Before and After spacing boxes to 0 pt to ensure perfect alignment.
- Click OK.
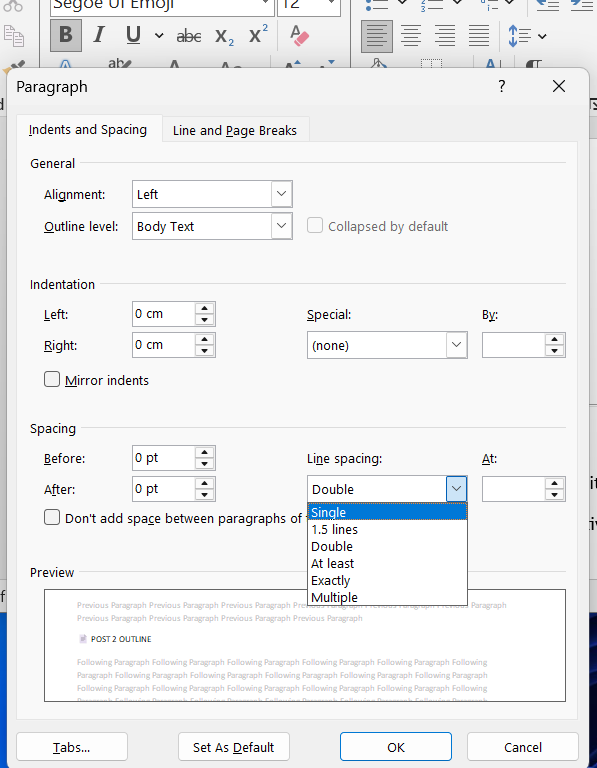
This method removes hidden padding between paragraphs that can make regular double spacing look messy.
Method 4: Use Design Tab to Apply Double Spacing to the Whole Document
This method is useful when you need to know how to double space in Word for an entire document without manually selecting text first.
- Open your Microsoft Word document.
- Click the Design tab in the top ribbon menu.
- Select Paragraph Spacing within the Document Formatting group.
- Choose Double from the dropdown list.
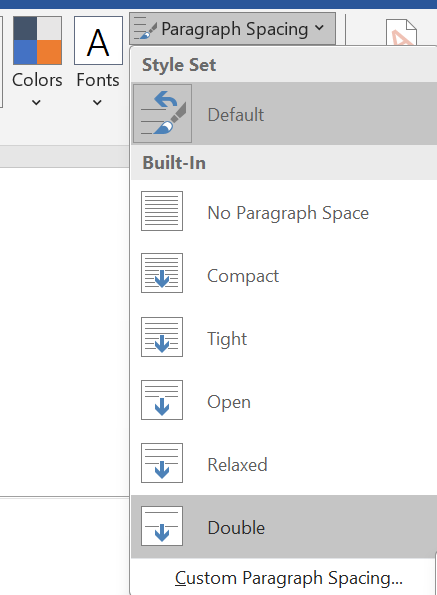
Note: This layout change affects every single paragraph, including your headings, so review your formatting visual structure once applied.
Method 5: How to Double Space in Word on a Mac
While the shortcuts are similar, Mac users can also utilize the classic Apple top menu system:
- Select your text (or press Cmd + A to select all).
- Click Format in the Apple top menu bar.
- Select Paragraph.
- In the Paragraph window, under Line Spacing, choose Double.
- Click OK.
How to Set Double Spacing as Default in Word
If you write academic papers frequently, you can force Word to always open new documents with double spacing already enabled.
- Go to Home → Line and Paragraph Spacing → Line Spacing Options.
- In the Paragraph dialog, set Line Spacing to Double.
- Click the Set As Default button in the bottom-left corner.
- Choose “All documents based on the Normal template”.
- Click OK.
Every new document will now open with double spacing automatically.
Troubleshooting: Why Is Double Space in Word Not Working?
If your formatting still looks incorrect, use this quick checklist to solve the issue:
| Problem | Fix |
|---|---|
| Extra space between paragraphs | Set “Spacing Before” and “After” to 0pt in Paragraph settings |
| Only part of the text changed | Use Ctrl+A to select ALL text before applying spacing |
| Spacing reverts after typing | Set double spacing as your default (see Method above) |
Frequently Asked Questions
What is the exact line spacing measurement for double space?
It is exactly 2.0. This scales dynamically based on your current font size. For example, if you use a 12pt font, your line spacing gap will be 24pt.
How do I double space on Microsoft Word Web / Online?
Select your text on the screen. Click the Layout tab in the top web ribbon. Click Line Spacing and choose 2. The change saves automatically to your OneDrive cloud.
Does double spacing apply to headers, footers, and footnotes?
No. Standard document line spacing only alters the main body text. You must double-click inside headers, footers, or footnotes individually to change their specific formatting rules.
Final Thoughts
Learning how to double space in Word is an essential formatting skill for students, writers, researchers, and business professionals. Whether you use quick keyboard shortcuts or the paragraph settings menu, applying this layout rule takes only a few seconds. If you regularly write in APA or MLA formats, setting it as your default template will save you time on every project.